You can create a service schedule by assigning the set schedule template, overtime rule, period, and holiday to a user.
You can also add a temporary schedule or personal vacation to the created service schedule.
 Note
Note
You can create a service schedule for a registered user.
| 1) | Click TIME ATTENDANCE > Schedule. |
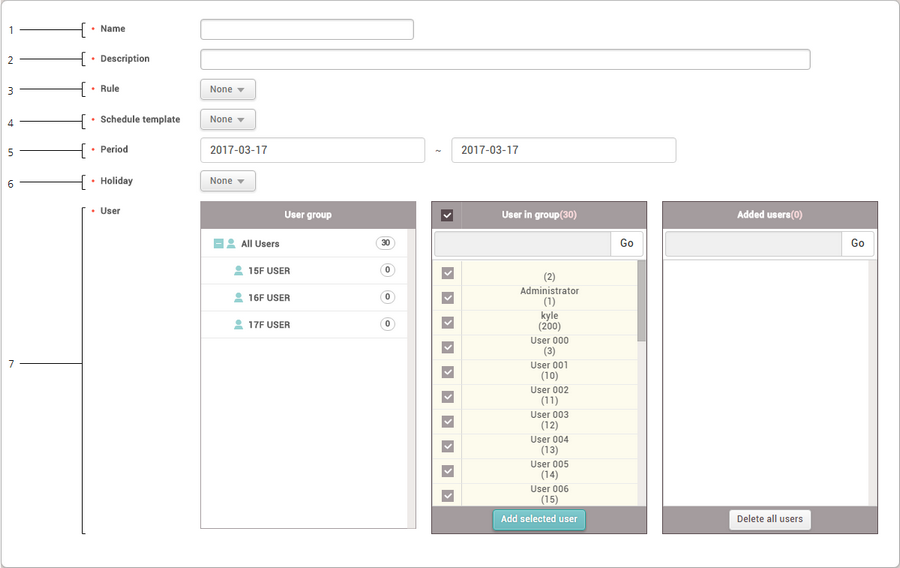
| 2) | Click Add and set each item. |
|
|
|
|
1
|
Name
|
Enter the desired schedule name.
|
2
|
Description
|
Enter a brief description of the schedule.
|
3
|
Rule
|
Select the set overtime rule.
When the overtime rule is set, the overtime service salary code set to the service rule will not apply. If you do not wish use it, set None.
Note
| ▪ | If there is no desired overtime rule, set one by referring to the Overtime Rule. |
|
4
|
Schedule Template
|
Select the set schedule template.
Note
| ▪ | If there is no desired schedule template, set one by referring to the Schedule Template. |
| ▪ | Once schedule template is set, it cannot be changed. |
|
5
|
Period
|
Set the period to collect T&A events.
Note
| ▪ | Once the start date is set, it cannot be changed. The end date can be changed, and when it is changed to a date which is earlier than the set date, leave events for the changed period will be deleted. |
|
6
|
Holiday
|
Select the set vacation schedule. If you do not wish use it, set None.
Note
| ▪ | If there is no desired vacation schedule, add a vacation schedule by referring to the Schedule. |
|
7
|
User
|
Add a user to apply the rule.
|
| 3) | To save settings, click Apply. |
| 4) | To delete a schedule, select the schedule you wish to delete from the list, and then click Delete schedule. |
Note
| ▪ | The number of users included in the entire schedule cannot exceed the maximum number of users for the T&A license you chose. To learn more about the maximum number of users per license, refer to License. |
|
If you have already registered schedule. you can set a different service rule to a user temporarily.
| 1) | Select a user assigned to the schedule from the list and click a date on the calendar. |
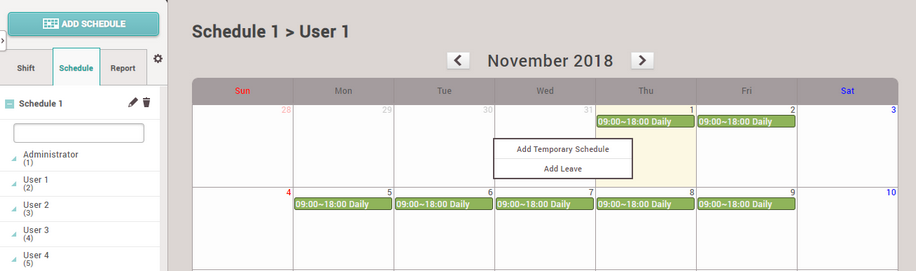
| 2) | Select Add Temporary Schedule and set each item. To apply it to other users equally, add a user by clicking  . . |
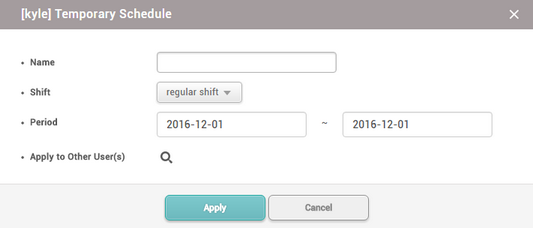
| 3) | When you click Apply, the shift for the set period will be changed. |
| 4) | To delete a temporary schedule, click the service schedule of the set temporary schedule, and then click Yes. |
|
You can add a user’s personal leave schedule.
| 1) | Select a user assigned to the schedule from the list and click a date on the calendar.
|
| 2) | Select Add Leave and set each item. To apply it to other users equally, add a user by clicking .
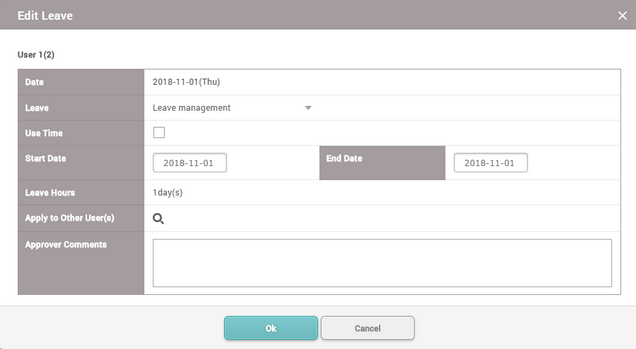 |
| 3) | When you click OK, the leave will be registered on the set period. |
| 4) | To delete a leave, click the registered leave and click Yes. |
Note
| ▪ | If there is no desired leave management Time code, add one by referring to the Time Code. |
|
