Adding User Information

Contents
You can add photo, name, email, telephone, etc. of a user.
A fingerprint scanner is required for adding users' fingerprints. If a fingerprint scanner is already connected to BioStar 2, you can use the scanner to add fingerprints.
| 1) | Click USER > ADD USER. |
| 2) | Enter or select the necessary fields in the Information tab. |
![]() Note
Note
| ▪ | The information with |
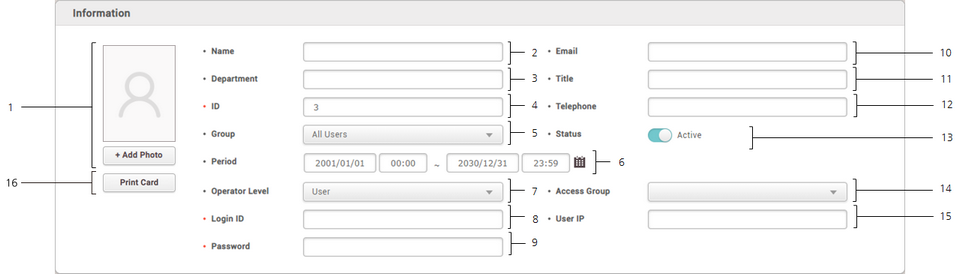
No. |
Item |
Description |
||||||||||||||||||
|---|---|---|---|---|---|---|---|---|---|---|---|---|---|---|---|---|---|---|---|---|
1 |
Photo |
Add the user's photo. Click + Add Photo to select the user's photo.
|
||||||||||||||||||
2 |
Name |
Enter the user's name.
|
||||||||||||||||||
3 |
Department |
Enter the department the user belongs to.
|
||||||||||||||||||
4 |
ID |
Enter a unique ID to assign to the user.
|
||||||||||||||||||
5 |
Group |
Select a user group. If no desired user group is available, add it by referring to Adding and Managing User Groups. |
||||||||||||||||||
6 |
Period |
Set an active period of the account. |
||||||||||||||||||
7 |
Operator Level |
Set a BioStar operator privilege level.
|
||||||||||||||||||
8 |
Login ID |
Enter the login ID.
|
||||||||||||||||||
9 |
Password |
Enter the login password. You can change the password level by referring to Security.
|
||||||||||||||||||
10 |
Enter the email address.
|
|||||||||||||||||||
11 |
Title |
Enter the user's title.
|
||||||||||||||||||
12 |
Telephone |
Enter the telephone number.
|
||||||||||||||||||
13 |
Status |
You can temporarily deactivate the user's account. |
||||||||||||||||||
14 |
Access Group |
Set an access group. If no desired access group is available, add it by referring to Adding and Managing Access Groups. |
||||||||||||||||||
15 |
USER IP |
Enter the user IP. If you register user IP, you can strengthen the security by allowing access only when the IP information registered in the account and the IP information of the PC match.
|
||||||||||||||||||
16 |
Print Card |
It can be printed as a card template with user information. Refer to CARD PRINTER for details on how to use the card printer. |
| 3) | Enter or select the necessary fields in the Credential tab and click Apply. For more information on adding credentials, see Adding User Credentials. |
![]() Note
Note
| ▪ | You can refer to the User/Device Management on the Server to learn how to add custom user fields for extra user information. |
![]()