Adding Custom Account Level

Contents
You can assign BioStar 2 operator privilege levels to registered users.
![]() Note
Note
| ▪ | The Admin Menu Settings may vary depending on the type of license that is activated. |
| 1) | Click Settings > ACCOUNT. |
| 2) | Click ADD CUSTOM LEVEL. |
| 3) | Enter or select the necessary items. Depending on the type of license activated, the account type may vary.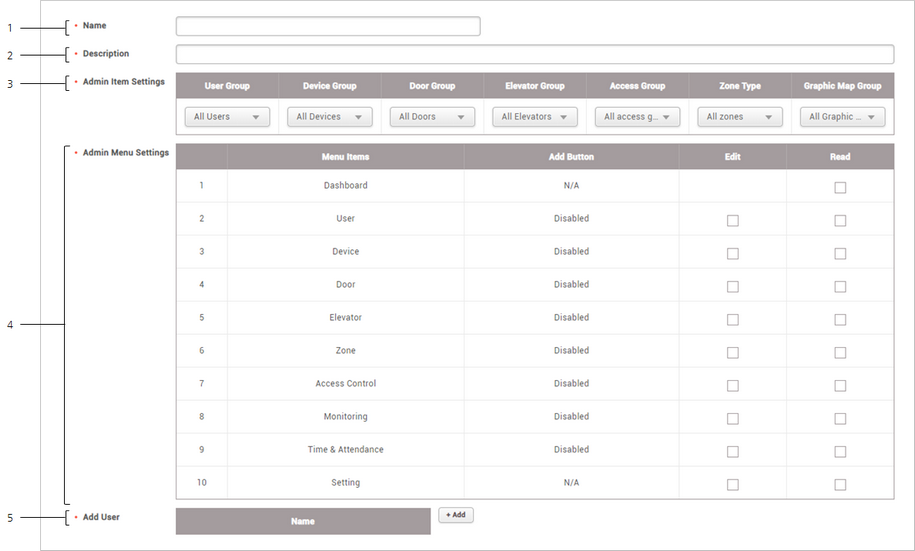 |
No. |
Item |
Description |
||||||
|---|---|---|---|---|---|---|---|---|
1 |
Name |
Enter the desired account level name. |
||||||
2 |
Description |
Enter a brief description of the account level. |
||||||
3 |
Admin Item Settings |
Set the detailed permission for each item. You can select groups to assign the edit and read permissions for each menu. Admin Item Settings can be set for User Group, Device Group, Door Group, Elevator Group, Access Group, Zone Type, Graphic Map Group and it can be set based on the already created group information. If there is no group you want, add a new group to that menu. For details about the creation of a group, refer to Adding and Managing User Groups, Adding and Managing Device Groups, Adding and Managing Door Groups, Adding and Managing Elevator Groups, Adding and Managing Access Groups, Adding and Managing Graphic Map Groups. |
||||||
4 |
Admin Menu Settings |
Set the edit and read permissions for the menu. A different permission can be set according to each menu.
|
||||||
5 |
Add User |
You can add or view the users assigned with the privilege. If you want to add a user, click + Add to add a user.
|
| 4) | Click Apply to save the settings. |
![]() Note
Note
| ▪ | Refer to the following example for configuring Admin Item Settings and Admin Menu Settings. |
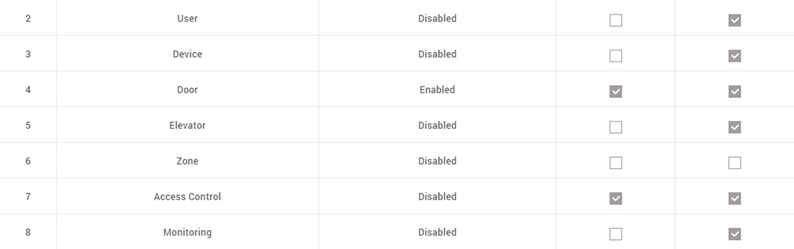 |
| - User: You can see the user information in the 'User Group 01'. However, you cannot add a new user or edit existing users. |
| - Device: You can see the device information in the 'Device Group 01'. However, you cannot add a new device or edit existing devices. |
| - Door: The setting of doors included in the 'Door Group 01' can be edited or deleted. You can edit the device of the door included in 'Door Group 01'. You can also add a new door to 'Door Group 01'. |
| - Elevator: You can see the setting of all the elevators. However, you cannot add a new elevator or edit existing elevators. |
| - Zone: You do not have permission. |
| - Access Control: The setting of access groups included in the 'AC Group' can be deleted. You can add or delete users and user groups to 'AC Group'. |
| - Monitoring: You can see the access control events of the devices included in 'Device Group 01'. And you can see the device and door status zone status and the alert history. You can also see a graphic map of 'All Graphic Maps'. However, you cannot control each status. |
| ▪ | If the configuring for Admin Item Settings and Admin Menu Settings do not match, the permission will not be assigned for that item. If you select the item of the menu by the account to which this custom permission was assigned, the 'Permission Denied' message is displayed. |
| ▪ | You can add an unlimited number of custom account levels. |