Account

Contents
You can assign BioStar 2 operator account levels to registered users.
| 1) | Click Settings > ACCOUNT. |
| 2) | Click an account type. Depending on the type of license activated, the account type may vary. |
| ▪ | Administrator: The user can use all menus. |
| ▪ | User Operator: The user can only use the USER and PREFERENCE menus. |
| ▪ | Monitoring Operator: The user can use the MONITORING and PREFERENCE menus and only view the DASHBOARD, USER, DEVICE, DOOR, ZONE and ACCESS CONTROL menus. |
| ▪ | Video Operator: The user can only use the VIDEO menu. |
| ▪ | T&A Operator: The user can only use the TIME ATTENDANCE menu and only view the USER menu. |
| ▪ | User: The user can only view own information and T&A records. |
| ▪ | Visitor Operator: The user can only use the VISITOR menu. |
| 3) | Click + Add and select a user or click 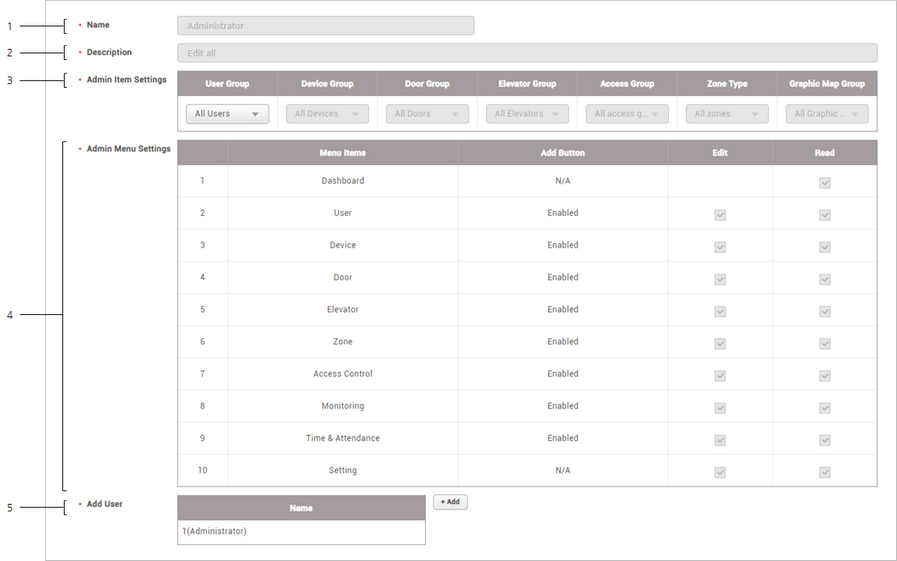 |
No. |
Item |
Description |
||
|---|---|---|---|---|
1 |
Name |
Shows the account level name. |
||
2 |
Description |
Show a brief description of the account level. |
||
3 |
Admin Item Settings |
Show the group assigned the permission. |
||
4 |
Admin Menu Settings |
Shows the assigned privileges. |
||
5 |
Add User |
Shows the list of users assigned with the privileges. Click + Add to add a user.
|
| 4) | Click Apply to save the settings. |
![]() Note
Note
| ▪ | If privileges have already been assigned while adding or editing users, the assigned users are shown on the list. |
| ▪ | Unless a user with the privilege for Edit saves settings after changing the detailed settings of each menu, the user with a Read privilege only can see the previous information yet to be modified. |
![]()