|
|
|
|
1
|
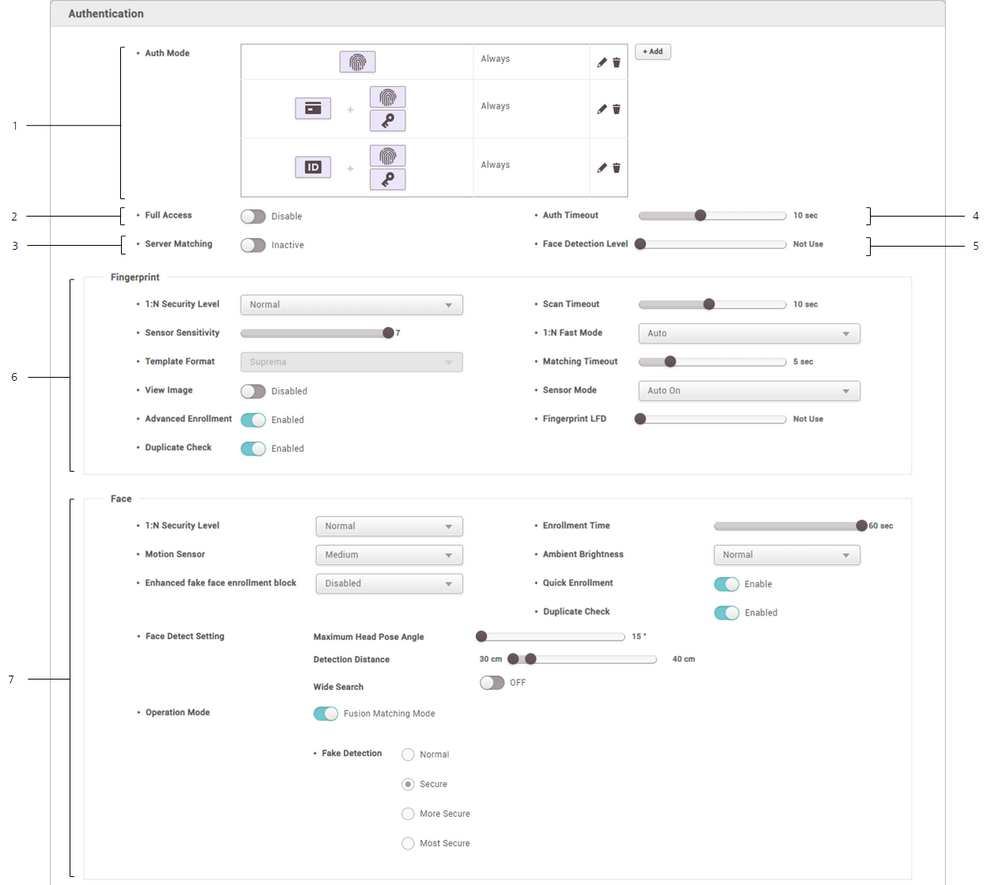
Auth Mode
|
You can configure the authentication modes of the device. BioStar 2 can use any combinations of fingerprint, ID, card, PIN and face as authentication modes.
| ▪ | Click + Add and create an authentication mode by dragging and dropping available options. Select a schedule and click OK to register the authentication mode. If no desired schedule is available, click + Add Schedule to create it. |
| ▪ | For more information on configuring schedules, see Schedules. |
|
2
|
Full Access
|
You can grant full access to users registered within the device without setting any access groups.
|
3
|
Server Matching
|
It is possible to set server matching. When Active is set, the authentication is carried out using the user information stored in the PC where BioStar 2 is installed, and when Inactive is set, the authentication is carried out using the user information stored in the device. When using server matching, the server matching of BioStar 2 should be also activated. For more information, refer to Server.
 Note Note
| ▪ | The devices and the firmware versions where server matching can be used are as follows.
- CoreStation FW 1.0.0 or later
- BioEntry P2 FW 1.0.0 or later
- BioEntry W2 FW 1.0.0 or later
- BioStation L2 FW 1.0.0 or later
- BioStation A2 FW 1.0.0 or later
- BioStation 2 FW 1.2.0 or later
- BioLite Net FW 2.2.0 or later
- BioEntry Plus FW 2.2.0 or later
- BioEntry W FW 2.2.0 or later
- XPass FW 2.2.0 or later
- XPass S2 FW 2.2.0 or later
- BioLite N2 FW 1.0.0 or later
- XPass D2 FW 1.0.0 or later
- XPass 2 FW 1.0.0 or later
- FaceStation 2 FW 1.4.0 or later
- FaceStation F2 FW 1.0.0 or later
- X-Station 2 FW 1.0.0 or later
- BioStation 3 FW 1.0.0 or later |
| ▪ | Server Matching is not available for FaceLite. |
| ▪ | Server Matching of Visual Face is not available for FaceStation F2 and BioStation 3. |
|
4
|
Auth Timeout
|
When using a combination of multiple credentials in Auth Mode, the system waits for this length of time to authenticate the second credential.
Set a timeout period for authenticating the second credential after authenticating the first credential. If the second credential is not authenticated within this time, the authentication fails.
|
5
|
Face Detection
|
You can set an algorithm step for recognizing a face with a camera built in a device when a user tries to authenticate.
If it is set to Normal, it can detect a face at an arm’s length. If it is set to High, it can detect a face at a shorter distance. If it is set to Not Use, it cannot use the face detection function.
Note
| ▪ | Only for BioStation A2 and X-Station 2. |
|
6
|
Fingerprint
|
You can configure the detail settings concerning fingerprint authentication.
| ▪ | 1:N Security Level: You can set a security level to use for fingerprint authentication. The higher the security level is set, the false rejection rate (FRR) gets higher, but the false acceptance rate (FAR) gets lower. |
| ▪ | Scan Timeout: You can set a fingerprint scan timeout period. If the fingerprint is not scanned within the set time, the authentication fails. |
| ▪ | Sensor Sensitivity: You can set a sensitivity level of the fingerprint recognition sensor. Set the sensor sensitivity higher if you wish to use a higher sensor sensitivity level and obtain more detailed fingerprint information. |
| ▪ | 1:N Fast Mode: You can set the fingerprint authentication speed. Select Auto to have the authentication speed configured according to the total amount of fingerprint templates registered within the device. |
| ▪ | Template Format: You can view the fingerprint template format. |
| ▪ | Matching Timeout: You can set the matching timeout period. If the authentication is not completed within the set time, the authentication fails. |
| ▪ | View Image: Displays the image of the fingerprint on the screen during the authentication process. |
| ▪ | Sensor Mode: If the option is set to Auto On, the sensor will automatically go on when it detects a finger. If the option is set to Always On, the sensor will always be on. |
| ▪ | Advanced Enrollment: Checks the quality of the scanned fingerprint to avoid the poor quality fingerprint template enrollment. The user will be alerted when the quality of the fingerprint scanned is low and given enrollment instructions. |
| ▪ | Fingerprint LFD: It is possible to set the live fingerprint detection level. If the live fingerprint detection level is higher, the false rejection rate on actual human fingerprints will increase. |
| ▪ | Duplicate Check: You can check for duplicates when registering fingerprints. |
Note
| ▪ | Editable fields vary depending on the device type. |
| ▪ | View Image is available only for BioStation 2, BioStation A2, BioStation L2, BioLite N2, FaceStation F2 (FSF2-ODB) and X-Station 2 (XS2-ODPB, XS2-OAPB). |
| ▪ | Fingerprint LFD is available only for BioStation A2, BioStation L2, BioEntry W2, BioLite N2, FaceStation F2 (FSF2-ODB) and X-Station 2 (XS2-ODPB, XS2-OAPB). |
|
7
|
Face
|
You can configure the detail settings concerning face authentication.
| ▪ | 1:N Security Level: You can set a security level to use for face authentication. The higher the security level is set, the false rejection rate (FRR) gets higher, but the false acceptance rate (FAR) gets lower. |
| ▪ | Enrollment Time: If a face is not registered during the set time when registering a user's face, the face registration will be canceled. |
| ▪ | Motion Sensor: Set the sensitivity for detecting motion near the device. |
| ▪ | Ambient Brightness: Sense the brightness near the device and adjust the intensity of IR LED. |
| ▪ | Enhanced fake face enrollment block: It is possible to set the Enhanced fake face enrollment block. If the live face detection level is higher, the false rejection rate on actual faces will increase. |
| ▪ | Light Brightness: Adjust the brightness level of IR LED manually. Select Normal or High to change the level or select Not Use to turn off the light. |
| ▪ | Quick Enrollment: Set whether or not to use a Quick Enrollment. When you set this option to Enabled, the face registration procedure is set to 1 step. If you set the option to Disabled, it is set to 3 steps. To register high-quality face templates, disable Quick Enrollment. |
| ▪ | Face Detect Setting: Set the environment for recognizing the user's face during face authentication.
- Maximum Head Pose Angle: Set maximum angle of head rotation.
- Detection Distance: Set the minimum and maximum detection distance.
- Wide Search: Set to ON, search for a face in the entire camera image. |
| ▪ | Operation Mode: Set the operation mode of the device when the face is authenticated.
- Fusion Matching Mode: Use both visual and infrared cameras to increase the face authentication accuracy.
- Fast Matching Mode: The device authenticates users who pass an access point without a pause within the authentication distance. |
| ▪ | Fake Detection: The device prevents user authentication using fake faces, such as photos. It is available when Operation Mode is set to Fusion Matching Mode. |
| ▪ | Duplicate Check: You can check for duplicates when registering faces. |
Note
| ▪ | Editable fields vary depending on the device type. |
| ▪ | Ambient Brightness, Enhanced fake face enrollment block and Quick Enrollment is available only for FaceStation 2 and FaceLite. |
| ▪ | Light Brightness is only available on FaceStation F2 firmware version 1.1.0 or later. |
| ▪ | Face Detect Setting and Operation Mode are available only for FaceStation F2 and BioStation 3. |
|
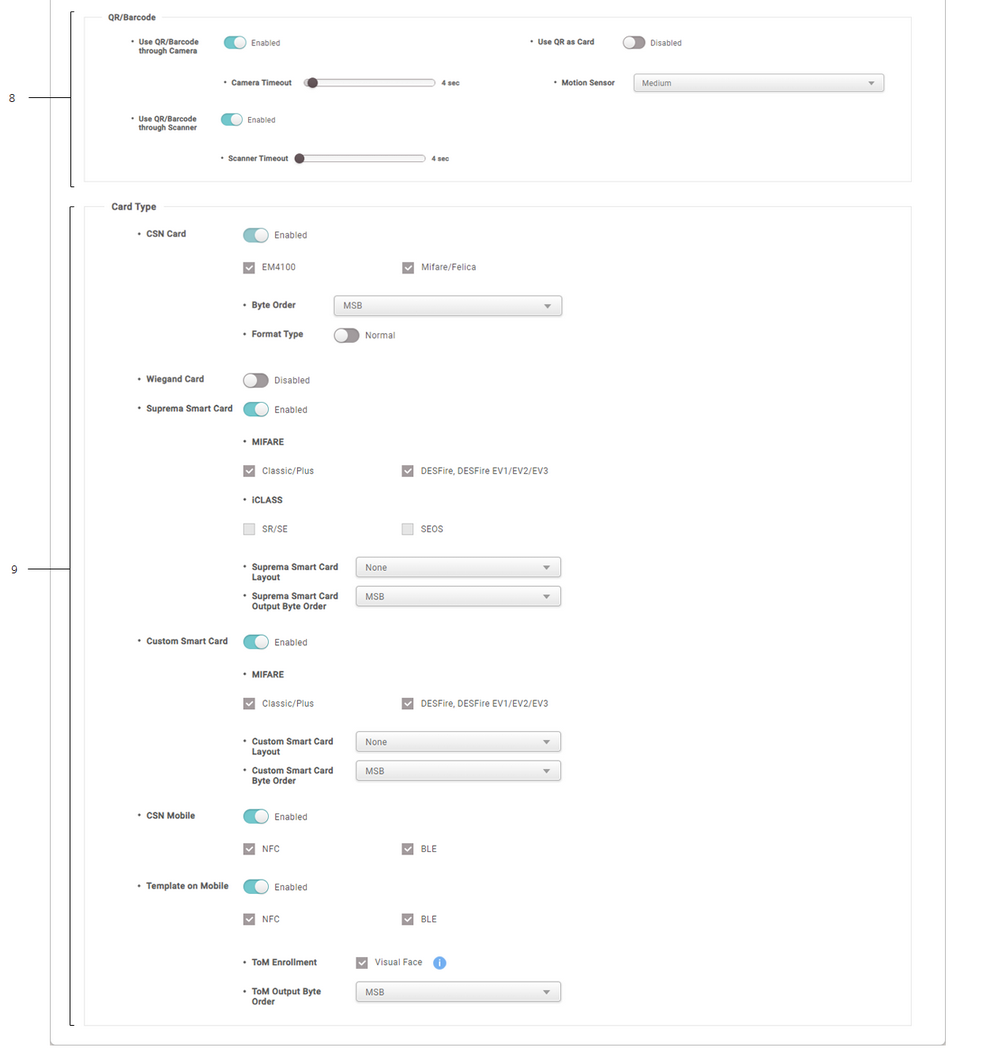
8
|
QR/Barcode
|
You can configure the detail settings concerning QR/Barcode authentication.
| ▪ | Use QR/Barcode through Camera: Set whether to use QR/Barcode authentication through the device's camera. |
| ▪ | Camera Timeout: You can set the camera's QR/barcode scan timeout period. If the QR/Barcode is not scanned within the set time, the authentication fails. |
| ▪ | Use QR as Card: Allows authentication with a QR code of the same data as the issued CSN card or Wiegand card. |
| ▪ | Motion Sensor: Set the sensor sensitivity of the camera for starting scanning. |
| ▪ | Use QR/Barcode through Scanner: Set whether to use QR/Barcode authentication through the device's scanner. |
| ▪ | Scanner Timeout: You can set a QR/Barcode scan timeout period. If the QR/Barcode is not scanned within the set time, the authentication fails. |
Note
| ▪ | Using Use QR/Barcode through Camera requires a separate device license. For more information, refer to Device License. |
| ▪ | The devices that can use Use QR/Barcode through Camera, Camera Timeout, Use QR as Card, and Motion Sensor are as follows.
- X-Station 2 (XS2-ODPB, XS2-OAPB, XS2-DPB, XS2-APB) firmware 1.2.0 or higher
- BioStation 3 (BS3-DB, BS3-APWB) firmware 1.1.0 or higher |
| ▪ | The devices that can use Use QR/Barcode through Scanner, and Scanner Timeout are as follows.
- X-Station 2 (XS2-QDPB, XS2-QAPB) |
|
9
|
Card Type
|
You can set the type of card used by the device.
Note
| ▪ | The type of card supported by the device is displayed. |
| ▪ | CSN Card: You can select the CSN card and format type and set the byte order. |
Note
| ▪ | If Format Type is set to Nornal, the device will read the card serial number (CSN). If the option is set to Wiegand, the device will read the card serial number in a Wiegand format that the user has defined. |
| ▪ | If Format Type is set to Wiegand, you can select the Wiegand format to be used in the device. To set a new Wiegand format, refer to Wiegand. |
| ▪ | When Byte Order is set to MSB, the device reads a card ID from the highest byte to the lowest byte. For example, the highest byte of the card ID 0x12345678 is 0x12 and the device sequentially reads 0x12, 0x34, 0x56 and 0x78. When the option is set to LSB, the device reads a card ID from the lowest byte to the highest byte. |
| ▪ | Wiegand Card: You can select a Wiegand card type and set the Wiegand format. |
Note
| ▪ | You can select the Wiegand format to be used in the device. To set a new Wiegand format, refer to Wiegand. |
| ▪ | Suprema Smart Card: It is possible to select the Suprema smart card layout to be used in the device and set the byte order. To set a new smart card layout, refer to Smart / Mobile Card. |
Note
| ▪ | When Suprema Smart Card Output Byte Order is set to MSB, the device reads a card ID from the highest byte to the lowest byte. When the option is set to LSB, the device reads a card ID from the lowest byte to the highest byte. |
| ▪ | Custom Smart Card: Select the type of Custom Smart Card issued by a third party and set Custom Smart Card Layout and byte order. To set a new smart card layout, refer to Smart / Mobile Card. |
Note
| ▪ | The devices and the firmware versions that can use the Custom Smart Card are as follows.
- XPass D2 FW 1.7.1 or later |
| ▪ | When Custom Smart Card Byte Order is set to MSB, the device reads a card ID from the highest byte to the lowest byte. When the option is set to LSB, the device reads a card ID from the lowest byte to the highest byte. |
| ▪ | CSN Mobile: Select the recognition method for the mobile card. |
| ▪ | Template on Mobile: Select the recognition method for Template on Mobile, specify which biometrics the user will enroll directly on the device, and set the byte order. |
Note
| ▪ | The devices and the firmware versions that can use the Template on Mobile are as follows.
- BioStation 3 FW 1.2.0 or later |
| ▪ | When ToM Output Byte Order is set to MSB, the device reads a card ID from the highest byte to the lowest byte. When the option is set to LSB, the device reads a card ID from the lowest byte to the highest byte. |
|