You can manage and control the population density of certain areas with Occupancy Limit Zone to prevent overcrowding. You can also monitor the occupancy limit zone status or set an alert to get notified when the zone has reached capacity.
 Note
Note
| ▪ | Up to 100 occupancy limit zones can be added. |
| ▪ | Devices and firmware versions that are compatible with the occupancy limit zone features are as follows:
- FaceStation F2 firmware version 1.1.0 or later
- FaceStation 2 firmware version 1.5.0 or later |
| 1) | Click ZONE and click ADD ZONE. |
| 2) | Click Occupancy Limit and click Apply. |
| 3) | Edit the necessary items. |
No.
|
Item
|
Description
|
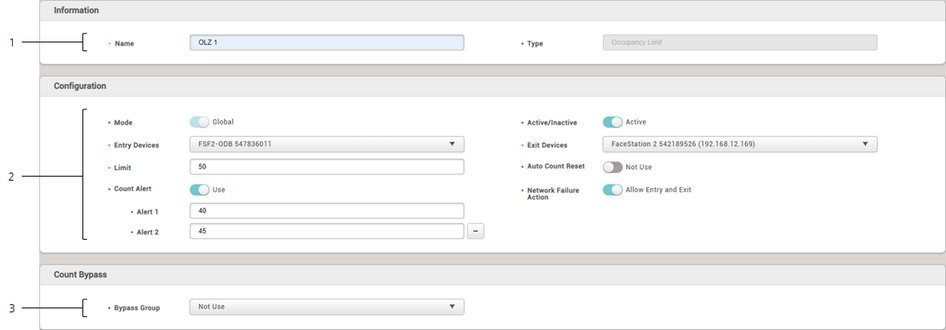
1
|
Information
|
Modify the information of the occupancy limit zone.
| ▪ | Name: Enter an occupancy limit zone name. |
| ▪ | Type: View the zone type. |
Note
| ▪ | Name can be up to 48 characters in length and cannot be set to the same name as other zones. |
|
2
|
Configuration
|
Modify the settings of the occupancy limit zone.
| ▪ | Mode: Check the application range of the zone. It only supports Global mode for the occupancy limit zone. |
| ▪ | Active/Inactive: Deactivate the occupancy limit zone. If the zone is deactivated, both Count that refers to the number of users in the zone and Count Bypass settings will be initialized. Select Active to enable it. |
| ▪ | Limit: Enter the number of users who will be restricted from entering the zone. If the number of users in the zone reaches the limit, entry will be restricted. You can enter a number from 0 to 10,000, and if it is set to 0, people can enter the zone without limit. |
| ▪ | Auto Count Reset: Set the time to automatically initialize Count. The Count will be initialized at the time you set every day. |
| ▪ | Count Alert: Set an alert to an administrator or set to save event logs before Count reaches the occupancy limit. When Count Alert is activated, the input field for Alert 1 appears. Click the  to set Alert 2. to set Alert 2. |
| ▪ | Network Failure Action: Set whether to allow users to enter or leave when a network error occurs in the device set in the zone. If you set it to Allow Entry and Exit, it stops entry restrictions when the device loses network connection, and people can enter the zone even if Count in the zone exceeds the occupancy limit. |
Note
| ▪ | A device cannot be assigned to the entry device and exit device simultaneously. |
| ▪ | You can set entry devices and exit devices up to 128 in total. |
| ▪ | A device using Dual Authentication cannot be set as the entry or exit device. |
| ▪ | Set the time of Auto Count Reset based on UTC in the country where the zone is located. For example, if the time is set to 00:00 in UTC+9, the count is automatically reset at 01:00 in UTC+10. |
| ▪ | You can set up two alerts for Count Alert and only enter numbers smaller than the Limit value. The values of both alerts must be different. |
|
3
|
Count Bypass
|
Set Count Bypass by selecting bypass groups to allow users in the group to enter the zone at any time without affecting the number of Count. The Bypass Count column displays the number of people from Count Bypass in the zone list.
Note
| ▪ | It is not able to use the Count Bypass feature when you set Thermal & Mask Check Mode as Check without authentication while using the device with a thermal camera. |
| ▪ | Up to 16 bypass groups can be added. |
|
| 4) | Click Apply to save the settings. |
The list of the registered occupancy limit zones will be display and it shows the current status of zones.
No.
|
Item
|
Description
|
1
|
Select All
|
Select all occupancy limit zones in the list.
|
2
|
Reset Count
|
Initialize both Count and Bypass Count settings. After initialization, user's entry and exit logs will be deleted, and Count may be inaccurate depending on the network status.
|
3
|
Page Navigation Buttons and Number of List Rows
|
You can move a page or set the number of list rows to be displayed on one page.
| ▪ |  : Go to the first page. : Go to the first page. |
| ▪ |  : Go to the previous page. : Go to the previous page. |
| ▪ |  : Enter the page number to move to. : Enter the page number to move to. |
| ▪ |  : Go to the next page. : Go to the next page. |
| ▪ |  : Go to the last page. : Go to the last page. |
| ▪ |  : Set the number of list rows to be displayed on one page. : Set the number of list rows to be displayed on one page. |
|
4
|
Activate
|
Activate the deactivated zone.
|
5
|
Deactivate
|
Deactivate the occupancy limit zone. If the zone is deactivated, both Count and Bypass Count settings will be initialized.
|
6
|
Search
|
Search the registered zone.
|
7
|
Delete
|
Delete the zone.
|
8
|
Occupancy Limit Zone List
|
The list of the registered occupancy limit zones will be display and it shows the current status of zones.
| ▪ | Name: View the zone name. |
| ▪ | Status: View the zone status.
- Normal: The number of users in the zone has not reached either preset alerts or the occupancy limit, and more users can enter the zone.
- Count Alert: The number of users in the zone has reached alert 1 or alert 2.
- Full: The number of users in the zone has reached the occupancy limit, and further entry will be restricted. |
| ▪ | Count/Limit: View the number of users currently in the zone and the occupancy limit. An administrator can directly modify the Count by clicking the - or + buttons or by inputting a value after clicking the Count section. |
| ▪ | Bypass Count: View the number of users belonging to Count Bypass in the zone. |
| ▪ | Device Status: View the network status of devices set in the zone.
- Normal: Networks work properly.
- Network Failure: A network error occurs in one or more devices. |
| ▪ | Full Screen: View the current status of the occupancy limit zone on the full screen. |
Note
| ▪ | If you have set Limit, you can enter up to 50,000. If you have not set Limit, you can enter up to 999,999. (numeral character only) You cannot enter a number above the maximum input value. If the actual number of people in the zone is greater than the maximum input value, the value exceeded will not be saved in the database. |
|
