You can create a T&A report with T&A events of a user collected through the system, and edit or export time records as a CSV file or a PDF file.
7 preset report filters can be used conveniently, or the administrator can set the filter manually.
 | Before Using the Multilingual Report |
BioStar 2 supports Korean and English language. To use multilingual report, please check the following.
Font Setting
| 1. | Go to [C:\Program Files\BioStar 2(x64)\ta\dist\setup\report_fonts]. |
| 2. | Create a folder with the language name you want to use. Refer to the ISO 639-1 standard for language name. For example, to use Spanish, create a folder named "es". |
| 3. | Copy and paste the font file into the folder you created. Only one TrueType Font is supported. |
PDF View Setting
|
BioStar 2 uses MariaDB as the default database. If you are using MS SQL database, please check the following.
When using BioStar 2 with MS SQL database, your PC's memory usage will accumulate each time you update the report if there are a large number of registered users. Reset Max Server Memory for the MS SQL database.
| 1. | Run Microsoft SQL Server Management Studio. |
| 2. | Right-click BioStar 2 database in Object Explorer and click Property. |
| 3. | Click Memory and then decrease the value of Max Server Memory. |
 Note Note
|
| 1) | Click TIME ATTENDANCE > Report. |
| 2) | To use a preset filter list, select a desired filter type, set either User Group or User and click Update Report. |
| 3) | To register a new filter, click ADD FILTER and set each item.
 |
|
|
|
|
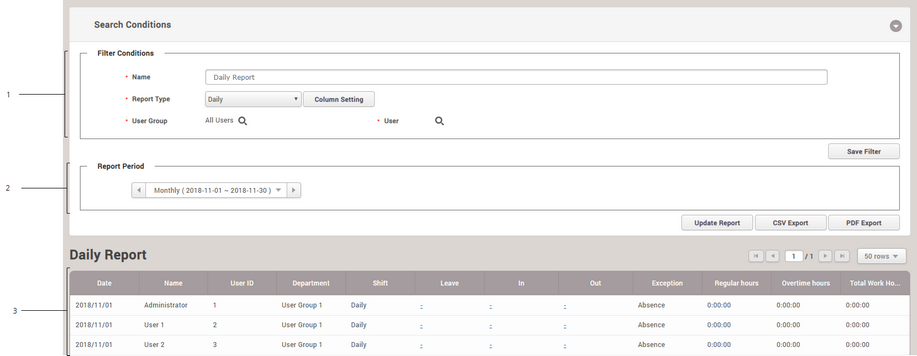
1
|
Filter Conditions
|
Set a new T&A report.
| ▪ | Name: Enter the desired report name. |
| ▪ | Report Type: Select the desired report type. Daily, Daily Summary, Individual, Individual Summary, Leave, Exception, Edit History, Working alarm time reports are available. |
| ▪ | Column Setting: Change or hide the order of columns in the report table. |
| ▪ | Filter: This function is enabled only when Leave or Exception is set for Report Type, and detailed conditions for leave or exception records can be selected. |
| ▪ | User Group / User: Select a user group or a user to create a report. |
| ▪ | Save Filter: Save the set T&A report as the filter. |
|
2
|
Report Period
|
Set the period of report.
| ▪ | Period: Set the period for creating a report to Daily, Weekly, Monthly, or Custom. |
| ▪ | In/Out Only: Select to output only the check-in and check-out logs of the user to the report. |
| ▪ | All Punches: Select to output all punches of the user to the report. |
Note
| ▪ | In/Out Only and All Punches are enabled only in Individual Report. |
| ▪ | Update Report: Update the report table to the most recent information. |
| ▪ | CSV Export: Save the created report as a CSV file. |
| ▪ | PDF Export: Save the created report as a PDF file. |
|
3
|
Report
|
View the created report.
|
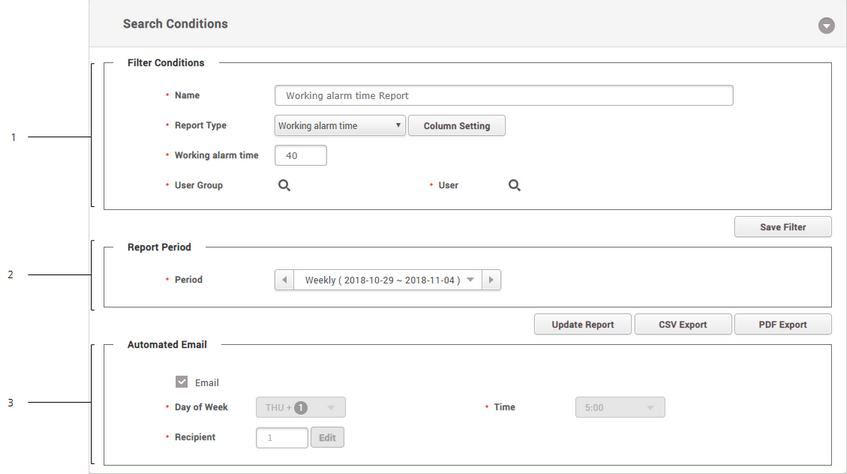
You can update the report for users who have reached their specified working hours, or notify the administrator by email.
You can update the Working alarm time report weekly.
| 1) | Click TIME ATTENDANCE > Report > Working alarm time Report. |
| 2) | Set each item in Filter Conditions and Report Period and then click Update Report. |
| 3) | Set Automated Email if you want to send an email notification to the administrator for users who have reached their specified working hours.
 |
|
|
|
|
1
|
Filter Conditions
|
Set a new T&A report.
| ▪ | Name: Enter the desired report name. |
| ▪ | Report Type: Select the desired report type. |
| ▪ | Column Setting: Change or hide the order of columns in the report table. |
| ▪ | Working alarm time: Set the time to generate Working alarm time report. |
| ▪ | User Group / User: Select a user group or a user to create a report. |
| ▪ | Save Filter: Save the set T&A report as the filter. |
|
2
|
Report Period
|
Set the period of report.
| ▪ | Period: Set the period for creating a report. |
| ▪ | Update Report: Update the report table to the most recent information. |
| ▪ | CSV Export: Save the created report as a CSV file. |
| ▪ | PDF Export: Save the created report as a PDF file. |
|
3
|
Automated Email
|
You can notify about users who have reached their specified working hours for the administrator by email.
| ▪ | Email: Click to send an email to an administrator automatically. |
| ▪ | Day of Week: You can set the days of the week to send an email to administrators. |
| ▪ | Time: You can set the time to send an email to administrators. |
| ▪ | Recipient: You can add an administrator's email address that receives the email. |
Note
| ▪ | You need to configure Filter Conditions and then save the filter in order to set up Automated Email. |
| ▪ | You can set the sender information for automatically sent emails in  |
|
|
