You can configure the scheduled unlock zone. The scheduled unlock zone keeps the door open based on the schedule that has been set.
 Note
Note
| ▪ | The scheduled unlock zone only supports local mode. |
| 1) | Click ZONE and click ADD ZONE. |
| 2) | Click Scheduled Unlock and click Apply. |
|
|
|
|
1
|
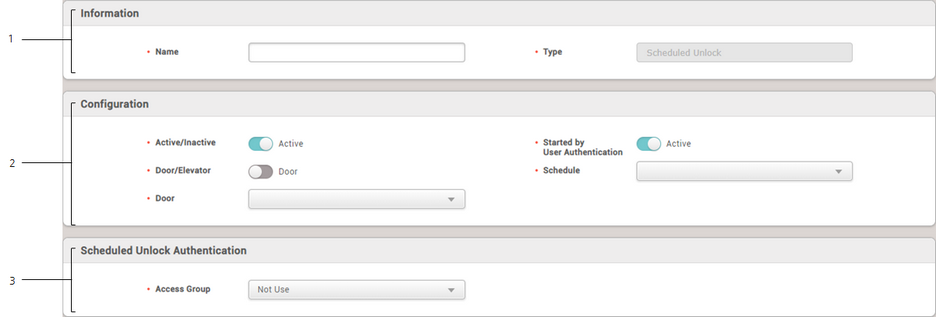
Information
|
Modify the information of the scheduled unlock zone.
| ▪ | Name: Enter a scheduled unlock zone name. |
| ▪ | Type: View the zone type. |
|
2
|
Configuration
|
Modify the zone settings of the scheduled unlock.
| ▪ | Active/Inactive: Disable the scheduled unlock zone. Select Active to enable it. |
| ▪ | Started by User Authentication: When set as Active, the user who belongs to the access group must authenticate in the configured schedule to start a schedule unlock. |
| ▪ | Door/Elevator: You can set doors or elevators as schedule unlock zones. |
| ▪ | Schedule: Select a schedule. If no desired schedule is available, click + Add Schedule to create it. |
| ▪ | Door: If you select Door, the door list is activated. Select the door(s) to include in the scheduled unlock zone. |
| ▪ | Elevator: If you select Elevator, the elevator list is activated. Select the elevators to include in the scheduled unlock zone. You can select multiple elevators. |
| ▪ | Floor: You can select the floor of the selected elevator. |
Note
| ▪ | You can configure a scheduled unlock zone by selecting multiple doors in local mode. |
| ▪ | If you select an elevator that has already been configured with a different scheduled unlock zone, you cannot set the same floor. |
|
3
|
Scheduled Unlock Authentication
|
You can select the access group where the user belongs who can start a scheduled unlock.
|
| 3) | Click Apply to save the settings. |
