Enroll Face

Contents
You can add the user's faces if the device supports face authentication.
![]() Note
Note
| ▪ | When registering a face, maintain a distance of 40cm to 80cm between the device and the face. |
| ▪ | Be careful not to change the facial expression. (smiling face, drawn face, wink, etc.) |
| ▪ | If you do not follow the instructions on the screen, the face registration may take longer or may fail. |
| ▪ | Be careful not to cover the eyes or eyebrows. |
| ▪ | Do not wear hats, masks, sunglasses or eyeglasses. |
| ▪ | Be careful not to display two faces on the screen. Register one person at a time. |
| ▪ | It is recommended for a user wearing glasses to register both faces with and without glasses. |
| 1) | Click + Face and configure the settings. |
 |
No. |
Item |
Description |
|---|---|---|
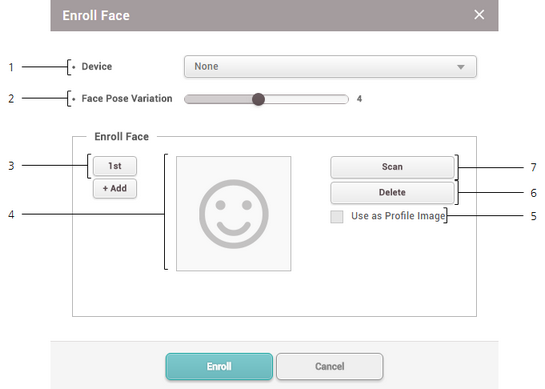
1 |
Device |
Select a device to enroll the face with. |
2 |
Face Pose Variation |
Set the sensitivity for the position, angle, and distance of a face when registering the face. Set the sensitivity high if you wish to obtain a detailed face template. |
3 |
Enroll Face |
Click + Add to add a face. Up to 5 faces can be added. |
4 |
Face Image |
View the registered face. |
5 |
Use as Profile Image |
Select the registered face you wish to use as your profile image. |
6 |
Delete |
Deletes the selected face. |
7 |
Scan |
Click Scan and then follow the instructions on the device screen to scan. |
| 2) | Click Enroll to enroll the face. |
| 3) | Set the 1:1 Security Level and click Apply. |
![]() Note
Note
| ▪ | If the face authentication rate is low, delete the existing face information and add a new face. |
| ▪ | Use an adequate security level. If 1:1 Security Level is too high, the authentication rate may be too low or the false rejection rate (FRR) may be too high. |