You can configure visiting sites and PCs. You can also set the terms and conditions for visitors.
And You can create the information fields that you want to know from the visitors by using the Custom Visitor Field.
 Note
Note
| ▪ | The VISITOR setting will appear when the Visitor license is activated. |
| ▪ | Activate the Automatic User Synchronization or Use Server Matching option to use the VISITOR. |
| 1) | Click Settings > VISITOR. |
| 2) | Set the necessary items. |

|
|
|
Site
|
You can set the access group to use in the visiting PC and managing PC of each site.
You can also set whether or not to use cards. If you are using a card, you can also set Card Type and Card Data Format.
| ▪ | Name: You can set the name of site. |
| ▪ | Access Group: You can select the access group to assign to the visitor. |
| ▪ | Card Use: You can set whether or not to use a card. |
| ▪ | Card Type: You can select the type of card to use in the site. The card type is activated only when you select Card Use. |
| ▪ | Card Data Format: You can configure the format for reading card data. The Card Data Format is activated only when you set the Card Type to Wiegand. |
Note
| ▪ | Up to 48 characters may be entered for a site name. |
Click Apply to save the setting of the site.
|
|
|
|
|
|
1
|
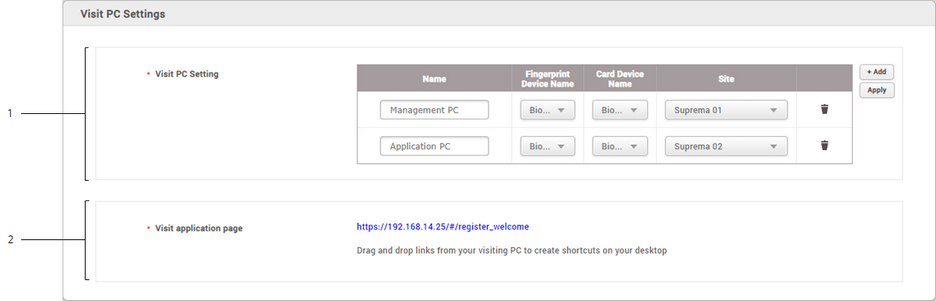
Visit PC Setting
|
You can set the visiting PC and managing PC.
| ▪ | Name: You can set the name of the visiting PC and managing PC. |
| ▪ | Fingerprint Device Name: Select a device to enroll visitors' fingerprints when visitors access the site using the fingerprint authentication. |
| ▪ | Card Device Name: Select a device to issue the card to visitors when visitors access the site using the card authentication. |
| ▪ | Site: Select a site to manage the visit on the visiting PC. |
Note
| ▪ | Up to 48 characters may be entered for a name of the visiting PC. |
| ▪ | You can use the fingerprint and card device at the same time. You can select only one for each. |
| ▪ | You can only select one site per PC. |
Click Apply to save the setting of the Visit PC Setting.
|
2
|
Visit application page
|
You can create a shortcut icon of Visit application page on the desktop of the visiting PC. Drag and drop the link to the desktop of the visiting PC.
|
|

|
|
|
Visit PC Select
|
You can select the PC set in Visit PC Setting and assign it to the current PC.
Click Apply to save the setting.
|
|

|
|
|
|
1
|
Terms and Conditions
|
You can set the terms and conditions for visitors.
Click  to activate the input field and enter the contents of terms and conditions. to activate the input field and enter the contents of terms and conditions.
Note
| ▪ | Up to 65,535 characters may be entered for the sentence of terms and conditions. |
| ▪ | Up to 64 characters may be entered for the sentence of accept terms and conditions. |
|
2
|
Privacy Policy
|
You can set the privacy policy for visitors.
Click to activate the input field and enter the privacy policy.
Note
| ▪ | Up to 65,535 characters may be entered for the sentence of privacy policy. |
| ▪ | Up to 64 characters may be entered for the sentence of accept privacy policy. |
|
3
|
Allowed period for credential
|
You can set the period for keeping personal data that visitors provide when they visit.
Click to activate the input field and enter the number of days to keep personal data.
Note
| ▪ | You can delete the visitors that have the personal data expired in VISITOR menu. |
|
4
|
Guide to Completion of Visit
|
You can set the guide to appear on the screen as a pop-up when a visitor completes an application for a visit.
Click to activate the input field and enter the guide for visitors.
Note
| ▪ | Up to 65,535 characters may be entered for the sentence of guide. |
| ▪ | If you do not enter the sentence of a guide, nothing will be displayed on the screen when visitors complete their visit application. |
|
5
|
Default access period for visitor
|
You can set the access period for visitors.
Click to activate the input field and enter the default access period for visitors.
|
|

|
|
|
Custom Visitor Field Settings
|
You can add custom visitor fields for extra visitor information and these fields appear on the visit application page.
| ▪ | Order: You can set the order of the Custom Visitor Field. |
| ▪ | Name: You can set the name of the Custom Visitor Field. |
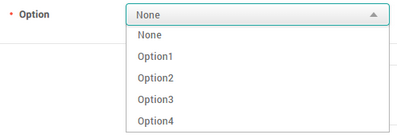
| ▪ | Type: You can choose the Text Input Box, Number Input Box or Combo Box. |
| ▪ | Data: Enter the options to appear in the combo boxes. Each item is separated by a semicolon (;). Data is only activated when Type is set to Combo Box. |
Note
| ▪ | For a Text Input Box, characters and numbers are allowed.
 |
| ▪ | For a Number Input Box, numbers are allowed and characters are not allowed.
 |
| ▪ | For a Combo Box, the items that have been set to the field are displayed as item. If you want to configure a combo box field as shown in the screenshot below, you need to enter Option 1;Option 2;Option 3;Option 4 in the data field.
 |
Click Apply to save the setting of the Custom Visitor Field.
|
|
