You can configure various connection settings such as TCP/IP and RS-485, etc.
 Note
Note
| ▪ | Editable fields vary depending on the device type. |
| 1) | Edit all fields of the Network tab. |
|
|
|
|
1
|
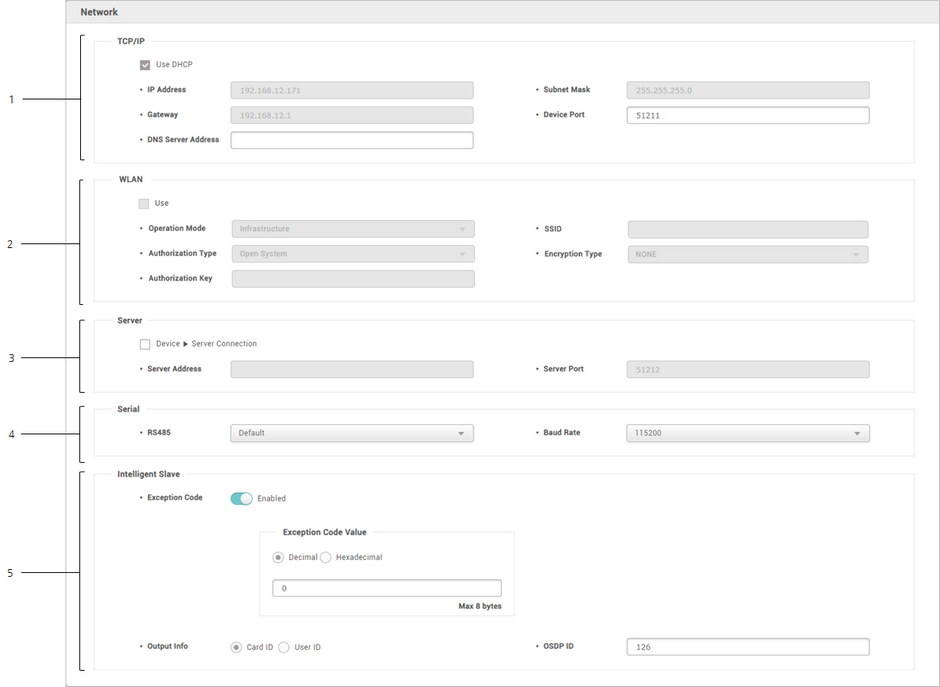
TCP/IP
|
You can configure the TCP/IP connection settings of the device.
| ▪ | Use DHCP: Select this option to allow the device to use a dynamic IP address. If this option is selected, network settings cannot be entered. |
| ▪ | IP Address, Subnet Mask, Gateway: Enter network settings of the device. |
| ▪ | Device Port: Enter a port to be used by the device. |
| ▪ | DNS Server Address: Enter a DNS server address. |
Note
| ▪ | The devices and the firmware versions where a DNS server address can be entered are as follows.
- BioStation L2 FW 1.0.0 or later
- BioStation A2 FW 1.0.0 or later
- BioStation 2 FW 1.2.0 or later
- BioLite Net FW 2.2.0 or later
- BioEntry Plus FW 2.2.0 or later
- BioEntry W FW 2.2.0 or later
- XPass FW 2.2.0 or later
- XPass S2 FW 2.2.0 or later
- FaceStation 2 FW 1.0.0 or later
- BioLite N2 FW 1.0.0 or later
- FaceLite FW 1.0.0 or later
- XPass 2 FW 1.0.0 or later
- FaceStation F2 FW 1.0.0 or later
- X-Station 2 FW 1.0.0 or later
- BioStation 3 FW 1.0.0 or later |
|
2
|
WLAN
|
Turns on or off the wireless LAN. You can also configure the wireless LAN related settings from the device menu. For the detailed information, refer to the device's user guide.
Note
| ▪ | Only for BioStation 2, BioStation A2, FaceStation 2 and BioStation 3. |
|
3
|
Server
|
You can enter connection settings to use in the server mode.
| ▪ | Device → Server Connection: Select this option to configure the BioStar 2 settings for connecting to the devices. If this option is selected, BioStar 2 server network settings can be entered. |
| ▪ | Server Address: Enter the IP address or domain name of the BioStar 2 server. |
| ▪ | Server Port: Enter the port number of the BioStar 2 server. |
Note
| ▪ | The devices and the firmware versions where a domain address can be entered for the server address are as follows.
- BioStation L2 FW 1.0.0 or later
- BioStation A2 FW 1.0.0 or later
- BioStation 2 FW 1.2.0 or later
- BioEntry W2 FW 1.0.0 or later
- BioEntry P2 FW 1.0.0 or later
- FaceStation 2 FW 1.0.0 or later
- BioLite N2 FW 1.0.0 or later
- BioLite Net FW 2.2.0 or later
- BioEntry Plus FW 2.2.0 or later
- BioEntry W FW 2.2.0 or later
- XPass FW 2.2.0 or later
- XPass S2 FW 2.2.0 or later
- XPass 2 FW 1.0.0 or later
- X-Station 2 FW 1.0.0 or later
- BioStation 3 FW 1.0.0 or later |
|
4
|
Serial
|
You can configure the connection mode and baud rate of devices connected over RS-485.
| ▪ | RS-485: Set a RS-485 mode. |
| ▪ | Baud Rate: Set a baud rate of the RS-485 connection. |
|
5
|
Intelligent Slave
|
When a user performs fingerprint authentication with a Suprema device connected to a third-party controller, the authentication result is transmitted as OSDP card data to perform multiple 1:1 or 1:N matching.
| ▪ | Exception Code: When using intelligent slaves, exception codes in decimal or hexadecimal can be sent to aggregate accurate logs in exceptional situations such as authentication failures. Decimal numbers can be entered from 0 to 18446744073709551615, and hexadecimal numbers can be entered from 0 to FFFFFFFFFFFFFFFF or hexadecimal characters. |
| ▪ | Output Info: You can output the card ID or user ID when authentication is successfully done. |
| ▪ | OSDP ID: Enter the OSDP address of the device. You can enter a number from 0 to 126. |
Note
| ▪ | Intelligent slave is activated only when the RS-485 option for Serial is set as Default. |
| ▪ | The devices and firmware versions that support Intelligent Slave are as follows.
- BioEntry W2 FW 1.6.3 or later
- BioStation L2 FW 1.6.1 or later
- BioEntry P2 FW 1.4.1 or later
- XPass 2 FW 1.2.3 or later
- X-Station 2 FW 1.1.0 or later
- BioLite N2 FW 1.4.1 or later
- FaceStation F2 FW 1.1.2 or later
- BioStation 3 FW 1.0.0 or later |
| ▪ | The data size of the Exception Code can be entered up to 8 bytes. |
|
| 2) | Click Apply to save the settings. |
