SIP Intercom
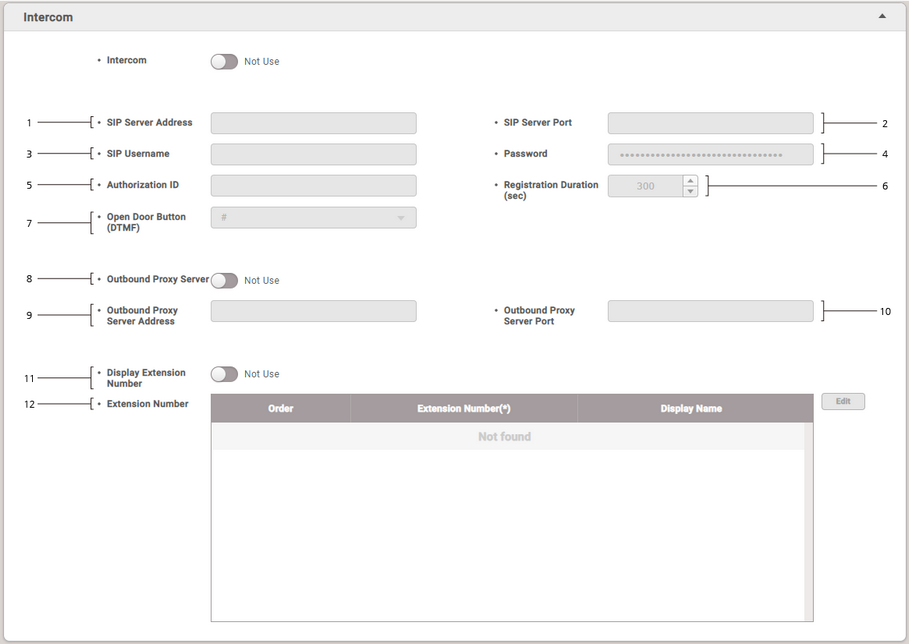
You can set the detailed settings of SIP Intercom.
![]() Note
Note
| ▪ | SIP Intercom is only supported on BioStation 3, FaceStation 2, BioStation A2. |
| ▪ | Editable fields vary depending on the device type. |
| 2) | Set Intercom to Use. |
| 3) | Fill SIP configurations to register the device to your SIP server. |
No. |
Item |
Description |
||||||||||||||||||
1 |
SIP Server Address |
Enter SIP server address. |
||||||||||||||||||
2 |
SIP Server Port |
Enter SIP server port. |
||||||||||||||||||
3 |
SIP Username |
Enter username of your SIP account.
|
||||||||||||||||||
4 |
Password |
Enter password of your SIP account. |
||||||||||||||||||
5 |
Authorization ID |
Enter authorization ID of your SIP account.
|
||||||||||||||||||
6 |
Registration Duration(sec) |
Enter Registration Duration in seconds. The device(SIP endpoint) tries to register to the SIP server every set Registration Duration.
|
||||||||||||||||||
7 |
Open Door Button(DTMF) |
Set a button to open the door on the phone. |
||||||||||||||||||
8 |
Outbound Proxy Server |
If your SIP service has a separate (outbound) proxy server, set this to Use. |
||||||||||||||||||
9 |
Outbound Proxy Server Address |
Enter the outbound proxy server address. |
||||||||||||||||||
10 |
Outbound Proxy Server Port |
Enter the outbound proxy server port. |
||||||||||||||||||
11 |
Display Extension Number |
If you mind the device displaying extension numbers on the screen, set this to Not Use.
|
||||||||||||||||||
12 |
Extension Number |
Register extension numbers up to 128. Click Edit to add / edit
|
| 4) | Click Apply to save the settings. |
